Posted by Natalie on October 19, 2010 · 7 Comments
What luck! This week’s Dorie pick fit right in with my
Pumpkin Palooza. The original recipe is for a caramel pumpkin pie, a basic pumpkin pie with a deep caramel mixture swirled in. I was in no mood to make a pie crust, so I went a different way. I made a half recipe of the filling, split it between these two pots, and covered it with Dorie’s almond streusel.
I have to say, the caramel taste was a little too strong for me. Dorie suggested that the caramel get to a deep mahogany color, but next time I wouldn’t take it as dark as I did. I think I’m more of a purist when it comes to pumpkin filling. I would definitely do the streusel topping and the individual portions again, though- very cute for an autumn dinner party.
Janell at
Mortensen Family Memoirs made this week’s pick. Thanks for choosing something I wouldn’t have normally tried, Janell.
Oh, and here’s Dorie’s almond streusel recipe:
In a small bowl, mix 2 tablespoons flour, 2 tablespoons butter (cut into bits), 2 tablespoons brown sugar and 2 tablespoons chopped almonds with your fingers. Store in the fridge until ready to use.
(I used the full recipe for two pots.)
I hope you’ll stick around for the rest of Pumpkin Palooza 2010. If you’ve got any must-make pumpkin recipes for me, comment below with links or email me at ovenloveblog@gmail.com.
Posted by Natalie on October 18, 2010 · 8 Comments
I’m pumped to share all of my best pumpkin recipes with you.
Let’s begin with these sweet little beauties.
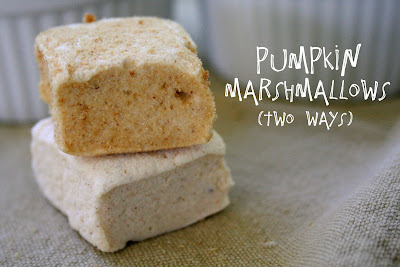
If you’ve never had a fresh marshmallow, get out your mixer right now, or find someone who will make these for you. This is not your mama’s marshmallow. Unless your mama makes homemade marshmallows. In that case, you already know how awesome they are. Fresh marshmallows are soft, pillowy and melt-in-your-mouth delicious.
I’ve made vanilla marshmallows before (for
my SIL’s bridal shower ages ago), and a pumpkin version has been calling my name for some time. I’ve been dying to get in on a pumpkin s’more! More on that later.
The marshmallow itself is the same, but I used two coatings for a little variety.
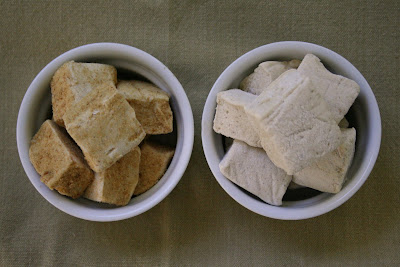
First up are the graham-dusted marshmallows. I love the warm color the graham coating gives them. Graham and pumpkin compliment each other, and I’m already thinking about using them in another pumpkin creation. These are the best for snacking right out of the container.
The second type is the classic powdered sugar-dusted marshmallow. The simple coating lets the pumpkin and strong spices come through. These are great for mixing into drinks.
Like your morning coffee, hot chocolate, cider or even tea. Chai would be heavenly.
You can use these for any recipe where you’d normally use marshmallows. My favorite application is pumpkin s’mores! These would also be TO-DIE in my
s’more brownie recipe, or these
s’more cookies. I’d pumpkinize any s’more recipe, really.
My only s’more and toasting tip is to wait until these are a few days old to toast. Fresh marshmallows are easier to toast when they get a little stale. You could even leave them out overnight to quicken the process.
Don’t be intimidated- these are not difficult to make. The only equipment you need is a stand mixer, a candy thermometer, and a little common sense. Marshmallows are a great introduction to working with sugar.
These would make adorable holiday gifts, all packaged up in cellophane and tied with twine. Swoon. I might think about cutting them up into mini-marshmallows and using them with Jess’s
DIY hot cocoa idea. Endless possibilities.. my brain might explode from all the cuteness!
Pumpkin Marshmallows
based on a recipe by Taste and Tell
makes about 30-40 1″ marshmallows
1 1/2 envelopes unflavored gelatin (about .4 oz if you’re using a scale)
1/4 cup cold water
1 cups sugar
1/3 cup corn syrup
2 tbs water
1/4 cup pumpkin puree
1/2 teaspoon ground cinnamon
1/2 teaspoon ground ginger
1/8 teaspoon fresh grated nutmeg
a pinch ground cloves
1/8 teaspoon salt
4-6 graham crackers
powdered sugar
Line an 8×8 pan with plastic wrap and spray it uniformly with cooking spray. Set aside.
Put the 1/4 cup cold water and the gelatin in the bowl of a stand mixer. Allow to sit and bloom for 10 minutes.
Meanwhile, combine the sugar, corn syrup and water in a saucepan over medium-high heat. Bring to a boil. Once it has started boiling, do not stir. Bring to 250F, or until a small amount of syrup dropped in a glass of cold water forms a rigid ball.
In a separate bowl, combine the pumpkin, cinnamon, ginger, nutmeg and cloves. Mix well.
Attach the mixing bowl to a stand mixer fitted with the wire whip attachment and start the mixer on low speed. Carefully pour the boiling sugar mixture down the side of the mixing bowl. Increase the speed to medium high and add the salt. Mix until stiff, shiny and white, about 5-7 minutes. Scrape down the sides of the mixing bowl occasionally with a rubber spatula.
Remove the bowl from the mixer and fold in the pumpkin mixture until combined. Return the bowl to the mixer and mix for an additional 3 minutes. You can test to see if it is ready if you dip a spatula in the mixture and it should form a continuous ribbon off the spatula into the bowl.
Pour the mixture into the prepared pan. Let it sit at room temperature for at least 8 hours.
Put the graham crackers in a food processor and process until you have very fine crumbs. Pour the crumbs into a shallow bowl. Fill another shallow bowl with powdered sugar. Remove marshmallows with the plastic wrap and place on a cutting board.
Cut the marshmallow into squares about 1″ x 1″. Dip half the marshmallows in the graham mixture and half in the powdered sugar. Dust of the excess.
The marshmallows are best eaten fresh, but can be kept in an airtight container or about a week or in the freezer for a month.
I hope you’ll stick around for the rest of Pumpkin Palooza 2010. If you’ve got any pumpkin recipes for me, comment below with links or email me at ovenloveblog@gmail.com.
Posted by Natalie on October 17, 2010 · 3 Comments
We’re already half-way through October. How does this keep happening? Time is flying, my loves.
One of my favorite things about October (besides PHILLIES BASEBALL!) is pumpkin. I know that every blogger and their third cousin is posting pumpkin recipes, but I’m not going to hide my love for these big orange beauties. Just can’t do it. Rather than try to be different, I’m going to jump right in. Let’s get our pumpkin on.
What are your favorite pumpkin recipes? I’d love to try them out or oven feature them in the palooza. Please leave your links in the comment section or email me your recipe at ovenloveblog@gmail.com. Can’t wait!
Posted by Natalie on October 16, 2010 · Leave a Comment
This isn’t exactly a recipe, but I just had to share it with you!
My real-life pal and blogger friend
Jess created these adorable DIY Hot Chocolate favors for her wedding at 35 cents a pop. Isn’t that amazing? I think they’d be great for stocking stuffers or a quick Christmas gift for a friend. You could even spice it up with different flavors- maybe do a spicy hot cocoa, a cinnamon version.. lots of possibilities!
These are made with pre-made hot cocoa mix (for cost reasons), but you could definitely do a from-scratch version. Homemade marshmallows would be a perfect addition, too. I’m pretty sure I’ll be posting my own version in a month or two.
Check out the full post and directions at
Ruffled– Jess is a finalist in their DIY contest, and she has a chance to win $500, $300 at ModCloth, or a Silhouette machine (jealous). If you like her project, make sure to leave a comment to convince the judges she should win.
This has me getting excited for the holidays and it’s not even Halloween. Thanks for the great idea, Jess!
Posted by Natalie on October 15, 2010 · 5 Comments
I’ve finally gotten my act together. I was so excited to start cooking through Dorie’s new book when I first heard about it. I mean, have you seen
Around My French Table? Just the cover will make you drool. But somehow, October 1 sneaked up on me and I totally missed making the first recipe, then the second. They were all on my list of things to make, but the Fridays came and went and no Dorie.
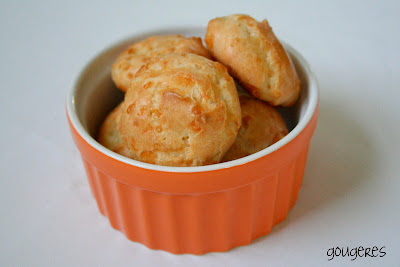
So here’s what you missed. Week one: Gougeres.
Gougeres are basically french cheese puffs. They’re made with the same light, airy dough as cream puffs-
pate a choux. I like to think that this is what fancy French people eat as a snack. I told my husband that and he said, “I wanna be French.” In my version, I used gruyere cheese and fresh goat’s milk and they tasted like a dream.
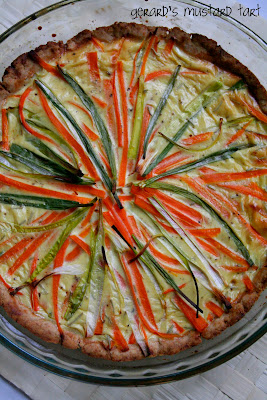
Week Two: Gerard’s Mustard Tart.
I’m not usually a big mustard person, but this was a great tart, just like Dorie said it would be. The mustard is subtle after baking and I love the simplicity of the carrots. I used green onions instead of the leeks called for in the recipe.
This week: (Spicy) Vietnamese Chicken Noodle Soup.
I’ve never made a soup with rice noodles before. I’m not sure I’ve even eaten rice noodles before, but these were good. I didn’t have fish sauce or dried red chilies available, so this soup ended up being milder than it should be, but I liked it that way. It was like a Vietnamese version of the kind of chicken noodle soup you have when you’re sick. It was comforting and tasty.
I liked all three of these recipes, but I think I like the gougeres best. Can’t wait for the next recipe- Hachis Parmentier (French Shepherd’s Pie)!
Posted by Natalie on October 14, 2010 · 1 Comment
It’s so cute when my husband requests cookies. He’s all, “would it be okay if maybe you made some cookies sometime this week, maybe?” Like I’m going to say no to a cookie request. Adorable.
I’ve had some
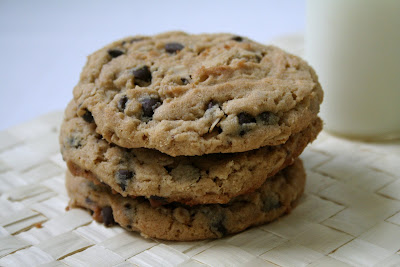
Chatfield Carob Chips* on hand for a long time now, and this was the perfect time to test them out. I love chocolate, but I’m always open to trying something new. I’ve had carob chips before in pre-made items, but I’ve never baked with them myself. They were an exact switch with chocolate chips- you could use them in any recipe that calls for chocolate chips. I was surprised at how much I liked the carob flavor. There was sweetness, but it was mild and didn’t have the chocolately aftertaste that you often get with semi-sweet chips.
I made a double batch of these cookies, thinking that 16 cookies wasn’t enough. The cookies ended up being giant-sized, but I love them that way. The soft center is perfect. They are truly hard to resist- I had to send them off with the hubs to keep them out of my sight, since I was eating them day and night. I’m encouraging you to try out the carob chips, seriously- I think you’ll welcome the change.
Peanut Butter Oatmeal Carob Chip Cookies
Makes about 16 cookies
1 cup all-purpose flour
1 teaspoon baking soda
¼ teaspoon salt
1 stick (½ cup) unsalted butter, at room temperature
½ cup creamy peanut butter
½ cup granulated sugar
1/3 cup light brown sugar
½ teaspoon vanilla extract
1 egg
½ cup rolled oats
1 cup carob chips
1. Preheat oven to 350 degrees F. Line two baking sheets with parchment paper and set aside.
2. Whisk together the flour, baking soda and salt; set aside.
3. On medium speed, cream together the butter, peanut butter, granulated sugar, brown sugar and vanilla extract, about 3 minutes. Add the egg and beat to combine. On low speed, gradually add the flour until just combined. Stir in the oats, and then the carob chips.
4. Use a large cookie scoop (3 tablespoons) and drop dough onto prepared baking sheets about 2 inches apart. Bake for 10 minutes, or until the cookies are lightly golden. Cool completely on the baking sheet and then store in an airtight container at room temperature.
*Chatfield provided me with one bag of carob chips to test out. Thanks, Chatfield!
Posted by Natalie on October 13, 2010 · 7 Comments
Warning: This is not good for you. Just sayin’.
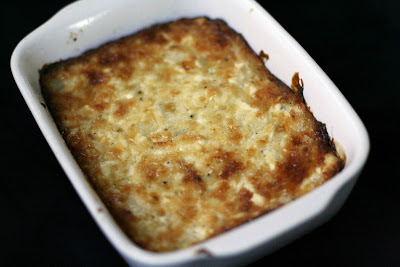
If you’re wondering why I’m even posting this recipe, you should know that I made this dip one time, two years ago, and I still think about it. This stuff is dangerously addicting. This is the kind of food that makes you think, “Wow. I now understand why Americans are dangerously overweight.” Because we come up with recipes like this.
I have been thinking a lot lately about the American food system since I watched
Food, Inc. this weekend. I mean, I knew things were bad, and that you should eat organic, blah blah, but I didn’t know all of the details. I know I’m late to the party on this movie- if you are, too, go watch it now, like right now. It made me feel like I couldn’t eat anything unless it came from my backyard. I now understand why people go vegan.
There is mayo in this recipe, can you believe that? I usually never eat mayo. I think it’s weird that people need their sandwiches to be all moist. It’s only in the fridge for the hubs’ sandwiches, really. But I hijacked it for this recipe, which I made before watching
Food, Inc. and becoming overly aware that half of the items in my cupboards are made of corn products. Ridiculous.
All that nonsense to say: if you’re going to make this dip, make it a rarity. Like, once every two years. I don’t want to be responsible for your onion dip addiction a few years down the line. Or make it for a party, where you can pass the heart attacks along to your loved ones. Is this post becoming a total downer? Yikes.
My point is, this dip is all-time, not all-the-time. It is crazy delicious, be careful!
Maybe eat it with some carrot sticks.
Baked Sweet Onion Dip
from White on Rice Couple
1 8 oz package of cream cheese (very softened)
1 cup mayo (preferably Best Foods brand)
1 cup freshly grated Parmesan cheese
1 cup diced or chopped sweet onion. You choose your size
1 tablespoon fresh cracked black pepper
Crusty bread or crackers
1. Pre-heat oven to 350 degrees. In bowl, place softened cream cheese. The cream cheese must be very, very, soft (like spreadable butter) to allow all ingredients to blend evenly together. If your cream cheese needs to soften more, place in microwave for a few seconds.
2. Add mayo, parmesan cheese, onions and fresh cracked black pepper to soft cream cheese till everything is mixed thoroughly.
3. Place mixture in ramekins or any oven safe dishes. Bake slowly, for about 30-45 minutes for all ingredients to cook together. When the top crust is brown, almost burnt looking then the dip is ready. The darker brown the crust of the dip becomes, the better the flavors are cooked.
4. Serve with your favorite bread and crackers.
Posted by Natalie on October 12, 2010 · 8 Comments
I’m always so surprised with myself when I make a Dorie recipe before the posting day. This is one of those months where I feel like I’m in the Dorie groove (the Tuesday groove, anyways. I have been majorly slacking on FFwD. I’m just not used to it yet!).
This torte was surprisingly delicious. I love the ease of the fold-over crust. This would be really great with apples, too- either way, it’s perfect for fall. I think it’s unique- something a little special, rather than your average apple pie. Make sure your pears aren’t too firm, though- mine were too firm from the start and I would have liked them a little softer in the torte.
Nice choice!
Posted by Natalie on October 9, 2010 · 1 Comment
Bad news, people. I didn’t make it to the next level of Project Foodbuzz. Lamesville, right? Oh, well. It was pretty serious competition, and my photos for the last challenge weren’t the best, so I graciously accept defeat and move on to bigger and tastier things. Thanks for all the voting and support along the way. You’re the best voters since sliced voters.
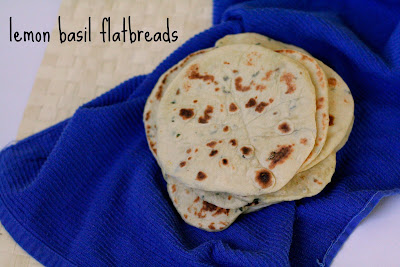
Speaking of tastier things.. have you ever made flatbread? It’s one of the easiest breads I’ve made, and the best part is that there’s instant gratification. No waiting two days for it to rise, or even an hour in the oven. All it takes is a 30 minute rest and then a minute or two on the stove top. Let me be clear- this is AWESOME. I always think about making bread for dinner when it’s too late, but these I could make any day, any time. I feel like I’ve made some sort of secret discovery. I think this recipe deserves the Great Bread stamp of approval.
I was doing a search on Tastespotting for “lemon basil” when I found these. We have a late crop of basil in our garden and we’ve got loads of lemons left from our dinner party last week, so I was on the search for ways to use them both (I’ve already made lemonade). I’m thinking about lemon basil ice cream next, so tune in this week to see if I can make that happen; it sounds like a dream.
The only thing I would change about these breads is to add a bit more salt, but that’s just personal preference. The texture is amazing- it’s a lot like Naan, pita or even a gordita- soft and chewy, just perfect for a little sandwich. I’d love to make a mexican version, a curry version, a garlic version, maybe even a sweet version! Look out for more flatbreads in your future, that’s all I’m sayin’.
In the mean time, make a couple of these bad boys and snack it up. It’s the weekend, get crazy.
Lemon Basil Flatbreads
from Cookistry
1 1/4 cups lukewarm water
2 teaspoons instant yeast
1 tablespoon sugar
Zest of one lemon
2 teaspoons lemon juice
12 medium basil leaves, finely sliced (chiffonade)
3 cups bread flour
1 teaspoon salt (optional)
2 tablespoons olive oil
In the bowl of your stand mixer, combine the water, yeast, and sugar, and set aside for 5 minutes, until it begins to get foamy.
Add the lemon zest, lemon juice, basil, and flour, and salt, if using, and knead with the dough hook until the dough is smooth and beginning to become elastic.
Add the olive oil and continue kneading until the oil is incorporated and the dough is smooth, shiny, and elastic.
Cover the bowl with plastic wrap and set aside for 30 minutes.
After 30 minutes, the dough will have risen, but it won’t be doubled. Take it out of the bowl, knead it briefly, and divide it into 12 roughly equal portions. They don’t have to be exactly the same unless you’re a perfectionist. I actually like the option of having some larger and some smaller.
Roll each portion into a ball as you would for buns, then flatten each one slightly. Cover them with a clean kitchen cloth so they don’t dry out as you’re working with them one at a time.
Assuming you’re using a cast iron pan, heat the pan over medium-high heat while you start rolling the flatbreads. You don’t need any oil – these are cooked in a dry pan.
On a lightly floured work surface roll the first flatbread to a 6-inch circle. It doesn’t have to be exact, and it doesn’t have to be a perfect circle. Brush off any excess flour and put the first flatbread in your frying pan. A little flour clinging to the flatbread is fine, but flour that falls off in the pan may burn so you want to remove as much as possible.
Start rolling the next flatbread while you’re keeping an eye on the first. It will start forming bubbles and might puff up completely. It will take a minute or so to cook on the first side, depending on how hot your pan is. When the the bottom is lightly browned in spots but the bread is still completely soft and pliable, it’s done on the first side.
Turn the bread over and cook on the second side for about 30 seconds or so. Again, you’re looking for a few brown spots. If the bread is puffy, press it down with a spatula so the whole surface is contacting the pan. Press gently to deflate it, and watch out for escaping steam.
If you get a good rhythm going, you can have the next flatbread rolled when the first one is finished. If you have a large griddle, or if you’re cooking them outdoors on your grill, you can cook two or three at a time. And here’s another time saver. If you’re cooking these on your grill, close the lid and they’ll cook on both sides. No need for turning, unless you want more browning (or grill marks) on that second side.
Have a clean kitchen towel ready for your flatbreads. Put them on the towel and fold the sides over to cover them as they’re done, and stack them up as you have more. They’re best served right away, while they’re still warm from cooking. If you want to reheat them later, just heat them briefly in your dry cast iron pan. A few seconds is all they’ll need.
Posted by Natalie on October 8, 2010 · 2 Comments
Burritos!
Never eat them, never make them.
And then I did, and here they are.
Sorry, but I am not a fan of those giant burritos the size of your head that the serve at the Q and the C and the M’s. There must be like 4 million calories in one of those things. It’s hard to look at them and think of that whole big burrito being in your stomach.. yeesh.
But, I mean, it’s cool if you like them! We can still be pals. I’m not really sure why I picked this recipe while browsing through the
F&W archives. Maybe it was the cheese, or the lack of rice.. I’m also not a fan of rice in burritos, but that’s another tangent. Anyways- these mini-sized (or should I say normal-sized!) burritos are delish. I made a simple tomato avocado salad to go along with the burrito and it was just enough to satisfy. No giant burrito belly for me! This is also a great meal for couples who are eating different portions sizes (one for me, two for hubs).
Can you believe we still have nice, ripe tomatoes in season down here in OCTOBER? It is baffling to me. The South has my seasons all confused. One day it’s 100, one day it’s 70. One day tomatoes, one day butternut squash. So from now on, I won’t comment on it. You’ll just have to deal with margaritas and grilling in December, okay?
Hot, fresh, and won’t put you into a food coma.
Chicken Burritos with Black Bean Salsa and Pepper Jack
Food & Wine
(meant to serve 4, but it made 8 servings for me!)
1 2/3 cups drained and rinsed black beans (from one 15-ounce can)
2 scallions including green tops, chopped
1 tablespoon lemon or lime juice
1/4 teaspoon ground cumin
1/2 teaspoon salt
1 1/3 pounds boneless, skinless chicken breasts (about 4)
1/4 teaspoon chili powder
1/4 teaspoon fresh-ground black pepper
1/2 pound pepper Jack cheese, grated
4 large (9-inch) flour tortillas (I used 8 8-inch tortillas)
Light the grill or heat the broiler. In a small glass or stainless-steel bowl, combine the beans, scallions, lemon juice, cumin, and 1/4 teaspoon of the salt.
Rub the chicken breasts with the chili powder, pepper, and the remaining 1/4 teaspoon salt. Cook the chicken over moderate heat for 5 minutes. Turn and cook until brown and just done, 4 to 5 minutes longer. Remove, let the chicken rest for a few minutes, and then slice.
Heat the oven to 350. Put one quarter of the cheese in a line near one edge of each tortilla. Top the cheese with one quarter of the black-bean salsa and then with one quarter of the chicken slices. Roll up the burritos and wrap each one in foil. Bake them until the cheese melts, about 15 minutes.
Make Ahead: You can assemble the burritos ahead of time and bake them just before serving. If they’ve been in the refrigerator, add about five minutes to the baking time.
Simple Tomato Avocado Salad
Oven Love
(serves 2)
1/2 ripe avocado, sliced
1 ripe tomato, sliced
1/4 cup red onion, sliced in rings
1 lemon or lime, halved
salt and pepper to taste
minced cilantro for garnish
Assemble the avocado, tomato and onion in layers on two plates. Squeeze the lemon or lime juice over the slices, salt and pepper to taste, and garnish with cilantro.
Don’t forget to enter the Food & Wine giveaway!
FOOD & WINE is giving away a year-long subscription to a lucky reader from Oven Love. Click here to enter and read official rules here.
This post is part of a series featuring recipes from the FOOD & WINE archive. As a FOOD & WINE Blogger Correspondent, I was chosen to do four recipes a week from FOOD &WINE. I received a subscription to FOOD & WINE for my participation.


