Great Bread: King Arthur Oatmeal Bread
I have discovered a new love: bread baking. I used to be scared, thinking I didn’t have the skill or the equipment to make great bread. But here’s the secret about making bread at home: all homemade bread is delicious.. even if it’s not perfect! It’s just got a special quality that store-bought bread can’t match.
So I’ve decided to start a new series called Great Bread. I’m hoping this will be an ongoing series as my love for bread baking grows. I love making things from scratch at home (see Pre-Made Our Way) and I can’t wait to share my findings with you.
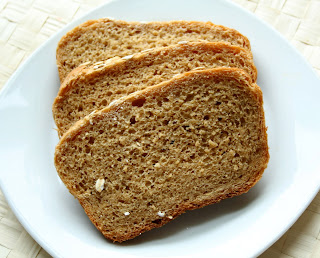
 We’ll start with King Arthur’s Oatmeal Bread. I was searching for a good sandwich bread, and after a tip from Wendy of Pink Stripes on Twitter, I found this recipe for Oatmeal Bread. How could I not trust King Arthur? It’s definitely a great sandwich bread- dense, substantial, with a light sweetness- perfect for toasting, grilled sandwiches, or just eating by the slice. I also love the oat flavor. The two loaves were finished in an afternoon, so you don’t need to devote hours to it, either. This definitely qualifies as Great Bread.
Oatmeal Bread (from King Arthur Flour)
1 cup (3 1/2 ounces) rolled oats
1 tablespoon butter
1 tablespoon salt
1/4 cup (3 ounces) molasses
2 tablespoons (1 ounce) brown sugar
2 cups (16 ounces) boiling water
5 cups (approximately) King Arthur Unbleached Organic Bread Flour
1 tablespoon instant yeast
In a large mixing bowl, or in the bowl of an electric mixer, combine the oats, butter, salt, molasses, brown sugar and boiling water, and let the mixture sit for 20 minutes. Mix in 2 cups of the flour and the yeast, and beat for 2 minutes, by hand or (preferably) electric mixer. Gradually add the remaining 3 cups of flour, mixing all the while, till a cohesive dough forms.
Turn the dough out onto a lightly floured or lightly greased work surface, and knead to form a smooth, elastic dough, adding flour only as necessary to prevent unbearable sticking. Place the dough in lightly greased bowl, cover with plastic wrap, and let it rise till doubled in bulk, 1 1/2 to 2 hours.
Gently deflate the dough, divide it in half, and shape each half into a log. Place the logs in two lightly greased 8 1/2 x 4 1/2-inch loaf pans, cover the pans, and let rise till doubled in bulk (or crowned about 1 inch over the rims of the pans), about 1 to 1 1/2 hours.
Bake the bread in a preheated 350°F oven for 30 to 35 minutes, or until an instant-read thermometer inserted into the center of the loaves registers 190°F. turn the loaves out onto a wire rack to cool completely. Yield: 2 loaves. (2 loaves of 18 slices=84 calories per slice)
Tuesdays with Dorie: Everything But .. Tiramisu Cake
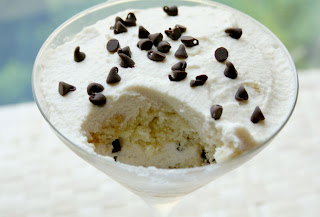
I had a plan for this TWD. I really did. I was going to make little cakelettes, I had it all planned out. But here’s what happened:

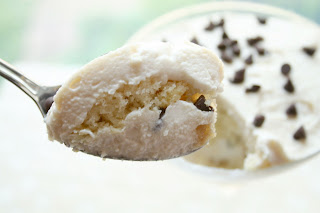
No matter how it looks, it all tastes good. coffee, cake, mascarpone, chocolate.. irresistible, frankly.
*Find the recipe here– thanks, Megan!
**Tuesdays with Dorie is a group of bloggers baking through Dorie Greenspan’s Baking: From My Home to Yours.
Lighter Sesame Chicken
I’ve been on a Martha kick. I think it’s because I made a big list of all the recipes I wanted to make from my EveryDay Food magazines.. now all I want to do is work through the recipes. Some people love Martha, some people hate her.. I just like her style and appreciate that she includes the nutritional info. (Feel free to voice your Martha feelings below- I’ll cut it out if you’re tired of her.)
Nick and I hadn’t had anything Asian in a while, so I picked out this recipe for Lighter Sesame Chicken from the list.
 The recipe has multiple components, but was simple to put together. Get the rice going, make the sauce, steam the broccoli, dredge and cook the chicken, and put it all together. It’s not a one-pot meal by any means, but it can be made with pantry staples (as long as you have sesame seeds). I liked the flavor, but I don’t think I’ve had enough sesame chicken in my life to tell you if it tasted authentic or not. You’ll just have to be the judge on this one.
 *Find the EveryDay Food recipe here.
May’s PMOW Challenge: Homemade Pop Tarts!
 It’s time for May’s “Pre-Made Our Way” Challenge! I mulled over this one for a while.. I wanted to do something sweet.. and I finally decide on homemade Pop Tarts!
 I saw this recipe months ago on Genesis of a Cook (through Tastespotting), but only remembered it today. I love the idea of Pop Tarts, and they always look tasty.. but they’re full of preservatives, so I never buy them. But now.. I get to try them at home, and I hope you will, too! There is lots of flexibility with this recipe- I can’t wait too see the flavors you come up with!
Instructions: This is a totally relaxed challenge. As usual, the only real requirement is to bake them. Ideally, though, please bake, take a photo or two, and post about it on your blog (it’s okay if you don’t have one!). Then, send one picture, the link to your blog post, and any comments to me at natalieherr@gmail.com. Then I’ll post a round-up of all of the participants by the end of the month. Please post and send pictures/comments by Sunday, May 30 at midnight. Have fun!
Homemade Pop Tarts
(original recipe from Peabody)
For Crust:
1 1/2 cups flour
1/2 tsp. salt
1/4 cup shortening
1/4 cup butter, softened
3 tbsp. cold water
For Filling:
Jam (your choice)
For Glaze:
1 cup powdered sugar
milk to thin
Sprinkles
1. Preheat oven to 450 degrees. Combine flour and salt in a large bowl. Add shortening and butter and blend with a fork, pastry cutter, or your hands. Blend until mixture is fairly coarse. Add water, 1 tbsp. at a time, gently mixing dough after each addiction until dough forms a ball.
2. Place dough on a lightly floured surface and roll into a square/rectangle. To about 1/8 thickness. Cut out long strips about 2 inches wide and 3 inches long. Repeat until dough runs out.
3. Take one pie crust rectangle and lace 1 tsp. of jam on top. Cover with another piece of pie crust and crimp all four edges. Repeat with the rest of dough. Place Pop-tarts on a baking sheet with parchment paper, and bake for 7-8 minutes.
4. While pop-tarts are baking, make glaze. Place powdered sugar in a bowl. Pour milk slowing until it has a consistency of really thick syrup. 1/2 a tbsp. to 1 tbsp. might be enough.
5. Once pop-tarts are done and cooled, top with glaze. Add sprinkles and serve.
Martha to the Rescue: Baked Eggs in Tomato Parmesan Sauce
I’m really loving eggs right now. There are always eggs in the fridge (usually at least 2 dozen at any given time.. I think that means I’m a real baker!) and I’m always trying to think of ways to use them. They’re cheap, always available and there are endless ways to prepare them. What’s not to love?
So when I saw this recipe for baked eggs in EveryDay Food, I had to give it a try. Nick’s not big on eggs unless they’re scrambled in his breakfast sandwich, but I wanted him to try this anyways. He loves marinara, so that persuaded him to at least try it. As expected, it wasn’t his favorite, but I thought it was pretty tasty.
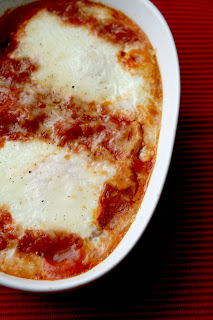 The ingredient list is simple: eggs. canned tomatoes. parmesan cheese. garlic. rosemary. I served it with big chunks of homemade crusty bread (no-knead bread is the easiest, hello! i’ll post it soon.) to sop up the tomato sauce. I overbaked the eggs a little bit, so I’ll have to practice that, but I’ll definitely try this one again. Maybe just for me. 🙂
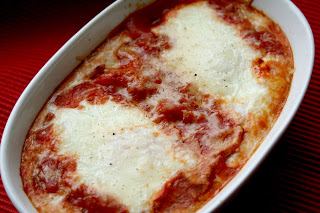 *Find the recipe for Baked Egss in Tomato Parmesan Sauce here.
For Dad: Cheese Danish
My Dad loves cheese danish. It’s his favorite.
He can often be found munching on them for breakfasts or snacks, hiding them in his coat pockets, you name it! So when he and my mom came to visit, I had to make him a from-scratch cheese danish.

This was my first attempt at homemade danish. I remembered seeing a danish braid recipe from Daring Bakers past, so I found that and started the process of making the dough. This is one of the more time intensive doughs I’ve made, but trust me… WORTH IT. If you want to make this for breakfast, definitely start the day before.
I liked the large braid, and it was nice for slicing, but I think next time I want to try individual danishes- more like the ones my dad stashes in his pockets. Pre-made, my way, baby! (Speaking of PMOW, I’ll post the next challenge soon, I promise!!)

The danish was, in a word, divine. It got my dad’s seal of approval, and that’s saying something! This is a great recipe to share with family and friends- a great addition to any breakfast or brunch. Or.. just something to have in the kitchen for slicing and enjoying when the mood strikes. This one’s for you, daddy!
 For the danish braid dough recipe, visit Sass & Veracity, the host of the DB recipe.
My cream cheese filling:
(fills one braid)
1 block cream cheese
1/2 cup sugar
1/2 tsp vanilla
Combine all and mix until smooth.
This Salad Will Change Your Life.
Maybe someone has told you before that eating salad can change your life (cough, infomercials, your doctor, 1-800-Jenny, cough). But I’m not kidding this time. This salad is amazing.
The idea for this salad came at the grocery store. I asked Nick what he wanted for lunch. He said, “salad.” And before you know it, my basket was full of things like jicama, mango, cilantro and avocado. We went Mexican, baby!
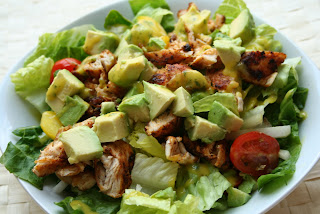 I loved this salad! It was so fresh, full of innumerable complimentary flavors. My mouth was just bursting! And, hello, I usually never eat salad dressing (I just make it for Nick), but this one I couldn’t pass up. It was out-of-this-world delicious. Do yourself a favor, and make this. A life-changing moment awaits you.
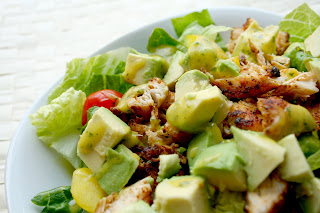
Salad Components:
Romaine Lettuce, chopped
Jicama, chopped or julienned (don’t be afraid of jicama! it’s crunchy, sort of like a radish.. yum!)
Avocado, chopped
Cherry Tomatoes, halved
Cucumbers, chopped or julienned
Yellow Bell Pepper, sliced or chopped
Mexican Spiced Chicken (see below)
Mango Cilantro Dressing (see below)
Mexican Spiced Chicken
makes as much as you want!
chicken breasts
chili powder
cumin
salt
pepper
olive oil
fresh garlic, chopped
Heat a few tablespoons olive oil in a medium skillet. While the skillet is heating, mix two parts chili powder, one part cumin, fresh garlic and salt and pepper to taste in a medium bowl. add olive oil just to moisten. Add chicken breast and cover with seasonings. Saute chicken breasts until cooked through. Let cool and slice or chop.
Mango Cilantro Dressing
(makes a cup or two)
1 fresh mango, chopped
a handful fresh cilantro, chopped
1-2 tablespoons honey
juice of one lime
salt and pepper
1/4-1/2 cup olive oil
Add all but the olive oil into a food processor and blend until smooth. Slowly, with the food processor running, add the olive oil until you reach your desired consistency/taste.
Tuesdays with Dorie: Chocolate Cream Bites
Staring at my fridge, full of leftover mini bread puddings and Iron Cupcakes and various sweet experiments, I wasn’t sure that I wanted to make another little dessert just so it would sit in my fridge. But, my love for Dorie and fear of being disowned by the other TWDers led me to these little babies.. Chocolate Cream bites!
 The recipe for this week, chosen by Kim of Scrumptious Photography, is Dorie’s Chocolate Cream Tart. I made the full recipe of chocolate tart dough, but only used 1/4 of it to make eight tiny shells. I made some changes to the cream filling recipe (see below) based on what I had in the house, and made 1/4 of it. I piped the cream filling into each tart shell and topped it with a little powdered sugar. Each little tart is 89 calories.. not too bad for a Dorie dessert!
 My cream filling (makes enough for 8 bites, 1/4 of the original recipe):
1/2 cup 2% milk (instead of whole)
1 egg yolk
1 tbs sugar
2 tsp cornstarch
1 oz semi-sweet chocolate (Dorie uses bittersweet)
2 tsp butter
Follow Dorie’s instructions!
*Find the original recipes here.
**Tuesdays with Dorie is a group of bloggers baking through Dorie Greenspan’s Baking: From My Home to Yours.
Green Series Finale: Green Frittata
Today brings our last installment of the Green Series. I hope you’ve been enjoying it! It’s been fun for me to put together these green recipes for you, and I hope you’ll enjoy them this spring and summer. The last recipe is great for breakfast, lunch or dinner- check out the Green Frittata!
 I loved this recipe! It’s tasty warm or cold, it’s low-cal, and it’s nutritious. It’s great with fruit salad or hash browns in the morning, or a salad with lunch or dinner. You’ll even have enough room for dessert! As always, you can switch out the vegetables for other things, and use any kind of cheese you’d like. Enjoy, lovelies- and after you’re done, go outside and enjoy the weather!
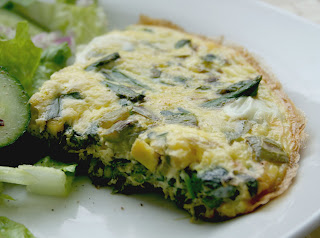
Green Frittata
serves four as a main dish (about 205 calories per slice)
1 tablespoon olive oil
1/2 bunch asparagus, cleaned and trimmed
4 scallions, chopped
1/2 green pepper, chopped
2 cups spinach
8 eggs
1/2 cup shredded white cheddar cheese
salt and pepper to taste
Preheat the oven to 400 degrees. Warm oil over medium heat in a medium skillet. Add asparagus and saute for 3 minutes. Add scallions and peppers, cook for 3-5 minutes. Add spinach, cook until wilted. Meanwhile, whisk eggs and add cheese, salt and pepper. Spread veggies evenly over the pan. Pour egg mixture into the pan and cook until edges begin to set. Place skillet into the oven and cook until eggs are completely set and top is brown, 5-10 minutes. Loosen the frittata from the pan onto a cutting board. Slice and serve.
Green Series: Green Pea Soup with Cheddar Scallion Quesadilla
Apologies to my lovely readers: Sorry I’ve been absent for the past few days! Things were a little crazy with Tickled Pink. I had a last minute wedding order and a promo event in two days.. fun, but time-consuming! But now I’m back, and bringing the Green Series back with me. Today’s recipe: Green Pea Soup with Cheddar Scallion Quesadilla.

This is basically a recipe from EveryDay Food, except they made paninis instead of quesadillas. We didn’t have great panini bread, but we did have tortillas, so that’s the route I went. I really enjoyed the pea soup- blissfully easy to throw together, and light, but still filling, for a summer lunch or dinner. The sharp cheddar in the quesadilla is a good match for the sweet peas. You can make this with fresh or frozen peas, whatever you have on hand.
If pea soup just isn’t your thing, here’s a quick recap of the Green Series recipes:
We’ve got one more Green Series recipe to round out the bunch. Check it out tomorrow!
And because I’m totally lazy.. you can find today’s recipe here. Happy Sunday!
